
This notebook is just me being frustrated on deep learning and trying to understand in "baby steps" what is going on here. For somebody that starts in this area with no background whatsoever it can be very confusing, especially because I seem to be unable to find code with many explanations and comments.
So, if you are frustrated just like I was when I started this stuff I hope the following guidelines will help you. I am by no means a teacher, but in this notebook I will:

This is my second notebook in the "series": How I taught myself Deep Learning.
- How I taught myself Deep Learning: Vanilla NNs
* PyTorch and Tensors * Neural Network Basics, Perceptrons and a Plain Vanilla Neural Net model * MNIST Classification using FNN * Activation Functions * Forward Pass * Backpropagation (Loss and Optimizer Functions) * Batching, Iterations and Epochs * Computing Classification Accuracy * Overfitting: Data Augmentation, Weight Decay, Learning Rate, Dropout() and Layer Optimization- Recurrent Neural Networks and LSTMs Explained
* 1 Layer RNNs * Multiple Neurons RNN * Vanilla RNN for MNIST Classification * Multilayer RNNs * Tanh Activation Function * Multilayer RNN for MNIST * LSTMs and Vanishing Gradient Problem * Bidirectional LSTMs * LSTM for MNIST Classification
Pro Tip: Use this tool to create your own convolutional neural nets.
For image classification, Feed Forward Neural Nets are not the best approach for a number of reasons:
They do not take the 2D geometry of the image into account. This means there is no notion of proximity. The human eye detects features in an image locally, meaning that it looks at portions of a picture and recognizes patterns, whereas FNNs don't. Instead, 1 neuron in the Hidden layer connects with ALL pixels from the image, NO matter their position in that image.

FNNs require many connections, therefore they have many weights (parameters) to compute. For example, if we have a 100x100 pixel image => 10,000 neurons in the first layer. If the second layer has 500 neurons, then we end up with 10,000x500 = 5,000,000 weights. Hence, there is large computing cost.
FNNs are prone to overfitting. This means they learn some features very well instead of learning to generalize.
Watch these 2 Youtube videos to grasp a better understanding of CNNs.
Convolutions solve the issues encoutered by FNNs:
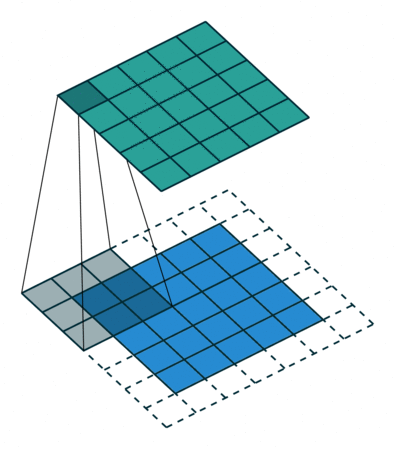
So: convolutional layers have multiple filters, composed by weights, that learn patterns in the data by sliding over the entire image.

Filters (like neurons in human visual cortex) in smaller layers detect edges, lines, and as the layers increase they start detecting shapes, patterns and even faces/ objects.
Convolutional Filter == Convolutional Layer == Kernel == Filter
Feature Map == Activation Map

# Original Image is formed by 3 channels
# Original pixels are the sum of R + G + B
print('Original Image top left corner:', 1+0+0, '\n')
# Filters: of size 3 x 3 containing trainable weights that identify patterns
print('R Output top left corner:', 1*0 + 0*1 + 1*0 + 0*1 + 3*1 + 2*2 + 1*1 + 1*0 + 1*0)
print('G Output top left corner:', 0*1 + 3*0 + 3*2 + 0*1 + 2*1 + 4*0 + 1*0 + 2*2 + 0*0)
print('B Output top left corner:', 0*1 + 0*1 + 3*1 + 0*0 + 1*0 + 1*2 + 2*1 + 3*1 + 1*2)
Original Image top left corner: 1 R Output top left corner: 8 G Output top left corner: 12 B Output top left corner: 12
# Imports
import torch
import torch.nn as nn
import torch.nn.functional as F
import torch.optim as optim
from torchvision import transforms
from torchvision.datasets import MNIST
import torchvision.models # for alexnet model
import numpy as np
import matplotlib.pyplot as plt
%matplotlib inline
import sklearn.metrics
import seaborn as sns
import random
import os
def set_seed(seed = 1234):
'''Sets the seed of the entire notebook so results are the same every time we run.
This is for REPRODUCIBILITY.'''
np.random.seed(seed)
random.seed(seed)
torch.manual_seed(seed)
torch.cuda.manual_seed(seed)
# When running on the CuDNN backend, two further options must be set
torch.backends.cudnn.deterministic = True
# Set a fixed value for the hash seed
os.environ['PYTHONHASHSEED'] = str(seed)
set_seed()
device = torch.device('cuda' if torch.cuda.is_available() else 'cpu')
print('Device available now:', device)
Device available now: cpu
# Import an image example
image = plt.imread("../input/suki-image/suki.jpg")
# See Image and Shape
print('Image shape:', image.shape)
plt.imshow(image);
Image shape: (320, 320, 3)
# Before aplying any convolutions we need to change the structure of the image:
# 1. Convert to Tensor
image = torch.from_numpy(image)
print('Image Tensor:', image.shape)
# 2. Bring the channel in front
image = image.permute(2, 0, 1)
print('Permuted Channel:', image.shape)
# Add 1 more dimension for batching (1 because we have only 1 image)
image = image.reshape([1, 3, 320, 320]).float()
print('Final image shape:', image.shape)
Image Tensor: torch.Size([320, 320, 3]) Permuted Channel: torch.Size([3, 320, 320]) Final image shape: torch.Size([1, 3, 320, 320])
To create Convolutions you need to have:
in_channels: the number of input channels (in this case 3, for MNIST data 1)out_channels: the number of output channels (any number, this is a hyperparameter that can be tuned) kernel_size: the size of the filter (this one is a matrix of 5 by 5 => 25 weights in total)padding: the amount of pixels outside the image (used to keep the size of the image intact)stride: the amount of pixels the filter is jumping (this one shrinks the image in size)Example: original image (6x6 pixels) | kernel_size (3x3) | padding (1) | stride (2)

# Create 1 convolutional layer
# Padding and Stride are at default values
convolution_1 = nn.Conv2d(in_channels=3, out_channels=5, kernel_size=5, padding=0, stride=1)
# Apply convolution to the image
conv1_image = convolution_1(image)
print('Convoluted Image shape:', conv1_image.shape)
Convoluted Image shape: torch.Size([1, 5, 316, 316])
Let's first visualize the way this convolution works:

Output: [(W - K + 2P)/S + 1] x [(W - K + 2P)/S + 1]
FNN: the trainable parameters include the network weights and biases (one weight for each connection, one bias for each output unit)
CNN: the trainable parameters include the convolutional kernels (filters) and also a set of biases. There is one bias for each output channel. Each bias is added to every element in that output channel.
# Select Convolution Parameters
conv_params = list(convolution_1.parameters())
print("len(conv_params):", len(conv_params)) # 2 sets of parameters in total
print("Filters:", conv_params[0].shape) # there are 5 filters for 3 channels with size 5 by 5
print("Biases:", conv_params[1].shape) # 5 biases for each filter
len(conv_params): 2 Filters: torch.Size([5, 3, 5, 5]) Biases: torch.Size([5])
# Convert result to numpy
conv1_numpy_image = conv1_image.detach().numpy()
# Remove the dim 1 batch
conv1_numpy_image = conv1_numpy_image.reshape([5, 316, 316])
# Normalize to [0, 1] for plotting
maxim = np.max(conv1_numpy_image)
minim = np.min(conv1_numpy_image)
conv1_numpy_image = conv1_numpy_image - minim / (maxim - minim)
print('Image after Conv shape:', conv1_numpy_image.shape)
# Plotting the channels
plt.figure(figsize = (16, 5))
for i in range(5):
plt.subplot(1, 5, i+1)
plt.imshow(conv1_numpy_image[i]);
Image after Conv shape: (5, 316, 316)
# We'll use the same image of Suki to continue with this example
# Create another convolutional layer (a second one)
convolution_2 = nn.Conv2d(in_channels=5, out_channels=8, kernel_size=10, padding=2, stride=2)
# Apply convolution to the LAST convolution created
conv2_image = convolution_2(conv1_image)
print('Convoluted Image shape:', conv2_image.shape)
Convoluted Image shape: torch.Size([1, 8, 156, 156])
Let's visualise what has happened:
new activation map size (remember, activation maps are the result of the filters applied to the image or another activation map): ((316 - 10 + 2x2) / 2) + 1 = 156

# Convert result to numpy
conv2_numpy_image = conv2_image.detach().numpy()
# Remove the dim 1 batch
conv2_numpy_image = conv2_numpy_image.reshape([8, 156, 156])
# Normalize to [0, 1] for plotting
maxim = np.max(conv2_numpy_image)
minim = np.min(conv2_numpy_image)
conv2_numpy_image = conv2_numpy_image - minim / (maxim - minim)
print('Image after Conv shape:', conv2_numpy_image.shape)
# Plotting the channels
plt.figure(figsize = (16, 5))
for i in range(8):
plt.subplot(1, 8, i+1)
plt.imshow(conv2_numpy_image[i]);
Image after Conv shape: (8, 156, 156)
AlexNet is a very popular CNN architecture that is capable of achieving high accuracies in classifying 1000 different groups (animals, breeds, onjects etc.). However, removing any layer or changing any of it's parameters could drastically degrade it's performance.
It is composed of features and classifier:
alexNet.features: it is the convolutional part of the network that identifies patternsalexNet.classifier: it is the classification part which takes the last output (last activation maps) of the features part and takes them through a FNN to output a prediction. There are 1000 different groups in which an image can be classified.For more information head here

# Import alexNet
alexNet = torchvision.models.alexnet(pretrained=True)
Downloading: "https://download.pytorch.org/models/alexnet-owt-4df8aa71.pth" to /root/.cache/torch/checkpoints/alexnet-owt-4df8aa71.pth
# AlexNet Structure:
alexNet
AlexNet(
(features): Sequential(
(0): Conv2d(3, 64, kernel_size=(11, 11), stride=(4, 4), padding=(2, 2))
(1): ReLU(inplace=True)
(2): MaxPool2d(kernel_size=3, stride=2, padding=0, dilation=1, ceil_mode=False)
(3): Conv2d(64, 192, kernel_size=(5, 5), stride=(1, 1), padding=(2, 2))
(4): ReLU(inplace=True)
(5): MaxPool2d(kernel_size=3, stride=2, padding=0, dilation=1, ceil_mode=False)
(6): Conv2d(192, 384, kernel_size=(3, 3), stride=(1, 1), padding=(1, 1))
(7): ReLU(inplace=True)
(8): Conv2d(384, 256, kernel_size=(3, 3), stride=(1, 1), padding=(1, 1))
(9): ReLU(inplace=True)
(10): Conv2d(256, 256, kernel_size=(3, 3), stride=(1, 1), padding=(1, 1))
(11): ReLU(inplace=True)
(12): MaxPool2d(kernel_size=3, stride=2, padding=0, dilation=1, ceil_mode=False)
)
(avgpool): AdaptiveAvgPool2d(output_size=(6, 6))
(classifier): Sequential(
(0): Dropout(p=0.5, inplace=False)
(1): Linear(in_features=9216, out_features=4096, bias=True)
(2): ReLU(inplace=True)
(3): Dropout(p=0.5, inplace=False)
(4): Linear(in_features=4096, out_features=4096, bias=True)
(5): ReLU(inplace=True)
(6): Linear(in_features=4096, out_features=1000, bias=True)
)
)
Finally, let's put everything into practice.
The Architecture will contain 2 main parts:
features part: which will take the images and put them through 2 convolutional layers that will learn features from the dataclassifier: a feed forward neural net containing 2 hidden layers and 1 output layer that will classify based on the learned features the image.MaxPool() - Data is spatially autocorrelated: if a given pixel is green, an adjacent pixel is more likely to be a different tone of green than bright pink. So, to reduce computational load, after each Convolution we can call
MaxPool2d()to reduce the activation map size to half. This method also introduces a degree of spatial invariance.ReLU() - It simply takes all the negative numbers in filter and turns them into 0
So, a natural techinque during convolutions is:
Conv2d()->ReLU()->MaxPool()
# Creating the Architecture
class CNN_MNISTClassifier(nn.Module): # the class inherits from nn.Module
def __init__(self): # here we define the structure of the network
super(CNN_MNISTClassifier, self).__init__()
# Convolutional Layers that learn patterns in the data
self.features = nn.Sequential(nn.Conv2d(1, 16, 3), # output size: (28-3+0)/1 + 1 = 26
nn.ReLU(), # activation function
nn.MaxPool2d(2, 2), # 26/2 = 13
nn.Conv2d(16, 10, 3), # output size: (13-3+0)/1 + 1 = 11
nn.ReLU(), # activation function
nn.MaxPool2d(2)) # 11/2 = 5
# FNN which classifies the data
self.classifier = nn.Sequential(nn.Linear(10*5*5, 128), # 10 channels * 5 by 5 pixel output
nn.ReLU(),
nn.Linear(128, 84),
nn.ReLU(),
nn.Linear(84, 10)) # 10 possible predictions
def forward(self, image, prints=False): # here we take the images through the network
if prints: print('Original Image shape:', image.shape)
# Take the image through the convolutions
image = self.features(image)
if prints: print('Convol Image shape:', image.shape)
# Reshape the output to vectorize it
image = image.view(-1, 10*5*5)
if prints: print('Vectorized Image shape:', image.shape)
# Log Probabilities output
out = self.classifier(image)
if prints: print('Out:', out)
# Apply softmax
out = F.log_softmax(out, dim=1)
if prints: print('log_softmax(out):', out)
return out
# Create Model Instance
model_example = CNN_MNISTClassifier()
model_example
CNN_MNISTClassifier(
(features): Sequential(
(0): Conv2d(1, 16, kernel_size=(3, 3), stride=(1, 1))
(1): ReLU()
(2): MaxPool2d(kernel_size=2, stride=2, padding=0, dilation=1, ceil_mode=False)
(3): Conv2d(16, 10, kernel_size=(3, 3), stride=(1, 1))
(4): ReLU()
(5): MaxPool2d(kernel_size=2, stride=2, padding=0, dilation=1, ceil_mode=False)
)
(classifier): Sequential(
(0): Linear(in_features=250, out_features=128, bias=True)
(1): ReLU()
(2): Linear(in_features=128, out_features=84, bias=True)
(3): ReLU()
(4): Linear(in_features=84, out_features=10, bias=True)
)
)
# Importing the MNIST data
mnist_example = MNIST('data', train=True, download=True, transform=transforms.ToTensor())
# Select only 1 image (index=13)
image_example, label_example = list(mnist_example)[13]
# Add 1 more dimension for batching (1 image in the batch)
image_example = image_example.reshape([1, 1, 28, 28])
Downloading http://yann.lecun.com/exdb/mnist/train-images-idx3-ubyte.gz to data/MNIST/raw/train-images-idx3-ubyte.gz
Extracting data/MNIST/raw/train-images-idx3-ubyte.gz to data/MNIST/raw Downloading http://yann.lecun.com/exdb/mnist/train-labels-idx1-ubyte.gz to data/MNIST/raw/train-labels-idx1-ubyte.gz
Extracting data/MNIST/raw/train-labels-idx1-ubyte.gz to data/MNIST/raw Downloading http://yann.lecun.com/exdb/mnist/t10k-images-idx3-ubyte.gz to data/MNIST/raw/t10k-images-idx3-ubyte.gz
Extracting data/MNIST/raw/t10k-images-idx3-ubyte.gz to data/MNIST/raw Downloading http://yann.lecun.com/exdb/mnist/t10k-labels-idx1-ubyte.gz to data/MNIST/raw/t10k-labels-idx1-ubyte.gz
Extracting data/MNIST/raw/t10k-labels-idx1-ubyte.gz to data/MNIST/raw Processing... Done!
How the schema of this example looks:

# Print Information
print('Image Example shape:', image_example.shape, '\n' +
'Label Example:', label_example, '\n')
# Create Log Probabilities
out = model_example(image_example, prints=True)
Image Example shape: torch.Size([1, 1, 28, 28])
Label Example: 6
Original Image shape: torch.Size([1, 1, 28, 28])
Convol Image shape: torch.Size([1, 10, 5, 5])
Vectorized Image shape: torch.Size([1, 250])
Out: tensor([[ 0.1298, 0.1114, -0.0218, 0.1346, 0.0179, 0.0940, 0.1215, -0.0768,
-0.0678, 0.1613]], grad_fn=<AddmmBackward>)
log_softmax(out): tensor([[-2.2367, -2.2552, -2.3883, -2.2319, -2.3486, -2.2725, -2.2451, -2.4433,
-2.4344, -2.2052]], grad_fn=<LogSoftmaxBackward>)
# Create criterion and optimizer
criterion = nn.CrossEntropyLoss()
optimizer = optim.Adam(model_example.parameters(), lr = 0.001, weight_decay=0.0005)
# Compute loss
# Label Example has been transformed to tensor and reshaped so it suits the requirements of function
loss = criterion(out, torch.tensor(label_example).reshape(1))
print('Loss:', loss)
# Backpropagation
# Clears all gradients
optimizer.zero_grad()
# Compute gradients with respect to the loss
loss.backward()
# Update parameters
optimizer.step()
Loss: tensor(2.2451, grad_fn=<NllLossBackward>)
# Import the train and test data
# Transforms data to Tensors using `transforms`
mnist_train = MNIST('data', train = True, download=True, transform=transforms.ToTensor())
mnist_test = MNIST('data', train = False, download=True, transform=transforms.ToTensor())
# Select only first 500 instances from each to make training fast
mnist_train = list(mnist_train)[:500]
mnist_test = list(mnist_test)[:500]
We'll use the same accuracy function used in the How I taught myself Deep Learning: Vanilla NNs notebook.
def get_accuracy(model, data, batchSize = 20):
'''Iterates through data and returnes average accuracy per batch.'''
# Sets the model in evaluation mode
model.eval()
# Creates the dataloader
data_loader = torch.utils.data.DataLoader(data, batch_size=batchSize)
correct_cases = 0
total_cases = 0
for (images, labels) in iter(data_loader):
# Is formed by 20 images (by default) with 10 probabilities each
out = model(images)
# Choose maximum probability and then select only the label (not the prob number)
prediction = out.max(dim = 1)[1]
# First check how many are correct in the batch, then we sum then convert to integer (not tensor)
correct_cases += (prediction == labels).sum().item()
# Total cases
total_cases += images.shape[0]
return correct_cases / total_cases
We'll use the same train function used in the How I taught myself Deep Learning: Vanilla NNs notebook (only change is that we'll create an Adam optimizer instead of SGD).

def train_network(model, train_data, test_data, batchSize=20, num_epochs=1, learning_rate=0.01, weight_decay=0,
show_plot = True, show_acc = True):
'''Trains the model and computes the average accuracy for train and test data.
If enabled, it also shows the loss and accuracy over the iterations.'''
print('Get data ready...')
# Create dataloader for training dataset - so we can train on multiple batches
# Shuffle after every epoch
train_loader = torch.utils.data.DataLoader(dataset=train_data, batch_size=batchSize, shuffle=True)
# Create criterion and optimizer
criterion = nn.CrossEntropyLoss()
optimizer = optim.Adam(model.parameters(), lr=learning_rate, weight_decay=weight_decay)
# Losses & Iterations: to keep all losses during training (for plotting)
losses = []
iterations = []
# Train and test accuracies: to keep their values also (for plotting)
train_acc = []
test_acc = []
print('Training started...')
iteration = 0
# Train the data multiple times
for epoch in range(num_epochs):
for images, labels in iter(train_loader):
# Set model in training mode:
model.train()
# Create log probabilities
out = model(images)
# Clears the gradients from previous iteration
optimizer.zero_grad()
# Computes loss: how far is the prediction from the actual?
loss = criterion(out, labels)
# Computes gradients for neurons
loss.backward()
# Updates the weights
optimizer.step()
# Save information after this iteration
iterations.append(iteration)
iteration += 1
losses.append(loss)
# Compute accuracy after this epoch and save
train_acc.append(get_accuracy(model, train_data))
test_acc.append(get_accuracy(model, test_data))
# Show Accuracies
# Show the last accuracy registered
if show_acc:
print("Final Training Accuracy: {}".format(train_acc[-1]))
print("Final Testing Accuracy: {}".format(test_acc[-1]))
# Create plots
if show_plot:
plt.figure(figsize=(10,4))
plt.subplot(1,2,1)
plt.title("Loss Curve")
plt.plot(iterations[::20], losses[::20], label="Train", linewidth=4, color='#7100FF')
plt.xlabel("Iterations")
plt.ylabel("Loss")
plt.subplot(1,2,2)
plt.title("Accuracy Curve")
plt.plot(iterations[::20], train_acc[::20], label="Train", linewidth=4, color='#FFD800')
plt.plot(iterations[::20], test_acc[::20], label="Test", linewidth=4, color='#FF8B00')
plt.xlabel("Iterations")
plt.ylabel("Accuracy")
plt.legend(loc='best')
plt.show()
Notice there is a much higher Test Accuracy for the CNN model vs the plain Vanilla FNN in the last notebook.
# Create Model Instance
model1 = CNN_MNISTClassifier()
# Train...
train_network(model1, mnist_train, mnist_test, num_epochs=200)
Get data ready... Training started... Final Training Accuracy: 1.0 Final Testing Accuracy: 0.832
def get_confusion_matrix(model, test_data):
# First we make sure we disable Gradient Computing
torch.no_grad()
# Model in Evaluation Mode
model.eval()
preds, actuals = [], []
for image, label in mnist_test:
# Append 1 more dimension for batching
image = image.reshape(1, 1, 28, 28)
# Prediction
out = model(image)
prediction = torch.max(out, dim=1)[1].item()
preds.append(prediction)
actuals.append(label)
return sklearn.metrics.confusion_matrix(preds, actuals)
plt.figure(figsize=(16, 5))
sns.heatmap(get_confusion_matrix(model1, mnist_test), cmap='icefire', annot=True, linewidths=0.1,
fmt=',')
plt.title('Confusion Matrix: CNN', fontsize=15);
Here is a very good resource to better visualize and understand MNIST Classification using CNN.

If you have any questions, please do not hesitate to ask. This notebook is made to bring more clear understanding of concepts and coding, so this would also help me add, modify and improve it.
If you liked this, upvote!
Cheers!