Ungraded Lab: Walkthrough of ML Metadata

Keeping records at each stage of the project is an important aspect of machine learning pipelines. Especially in production models which involve many iterations of datasets and re-training, having these records will help in maintaining or debugging the deployed system. ML Metadata addresses this need by having an API suited specifically for keeping track of any progress made in ML projects.

As mentioned in earlier labs, you have already used ML Metadata when you ran your TFX pipelines. Each component automatically records information to a metadata store as you go through each stage. It allowed you to retrieve information such as the name of the training splits or the location of an inferred schema.

In this notebook, you will look more closely at how ML Metadata can be used directly for recording and retrieving metadata independent from a TFX pipeline (i.e. without using TFX components). You will use TFDV to infer a schema and record all information about this process. These will show how the different components are related to each other so you can better interact with the database when you go back to using TFX in the next labs. Moreover, knowing the inner workings of the library will help you adapt it for other platforms if needed.

Let's get to it!

Imports

Download dataset

You will be using the Chicago Taxi dataset for this lab. Let's download the CSVs into your workspace.

Process Outline

Here is the figure shown in class that describes the different components in an ML Metadata store:
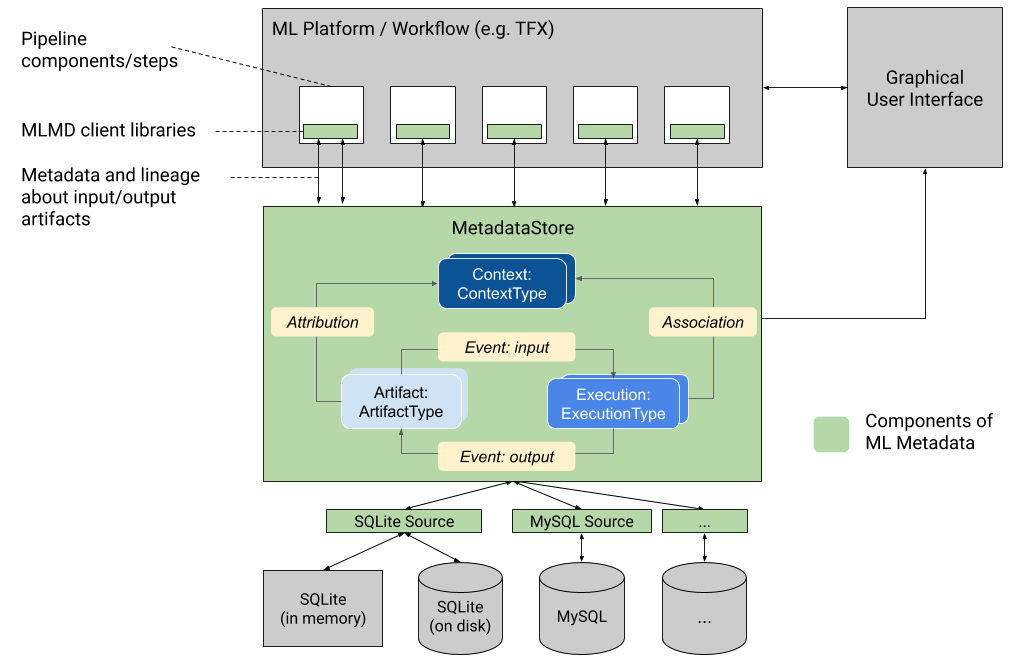
image of mlmd overview

The green box in the middle shows the data model followed by ML Metadata. The official documentation describe each of these and we'll show it here as well for easy reference:

As mentioned earlier, you will use TFDV to generate a schema and record this process in the ML Metadata store. You will be starting from scratch so you will be defining each component of the data model. The outline of steps involve:

  1. Defining the ML Metadata's storage database
  2. Setting up the necessary artifact types
  3. Setting up the execution types
  4. Generating an input artifact unit
  5. Generating an execution unit
  6. Registering an input event
  7. Running the TFDV component
  8. Generating an output artifact unit
  9. Registering an output event
  10. Updating the execution unit
  11. Seting up and generating a context unit
  12. Generating attributions and associations

You can then retrieve information from the database to investigate aspects of your project. For example, you can find which dataset was used to generate a particular schema. You will also do that in this exercise.

For each of these steps, you may want to have the MetadataStore API documentation open so you can lookup any of the methods you will be using to interact with the metadata store. You can also look at the metadata_store protocol buffer here to see descriptions of each data type covered in this tutorial.

Define ML Metadata's Storage Database

The first step would be to instantiate your storage backend. As mentioned in class, there are several types supported such as fake (temporary) database, SQLite, MySQL, and even cloud-based storage. For this demo, you will just be using a fake database for quick experimentation.

Register ArtifactTypes

Next, you will create the artifact types needed and register them to the store. Since our simple exercise will just involve generating a schema using TFDV, you will only create two artifact types: one for the input dataset and another for the output schema. The main steps will be to:

Bonus: For practice, you can also extend the code below to create an artifact type for the statistics.

Register ExecutionType

You will then create the execution types needed. For the simple setup, you will just declare one for the data validation component with a state property so you can record if the process is running or already completed.

Generate input artifact unit

With the artifact types created, you can now create instances of those types. The cell below creates the artifact for the input dataset. This artifact is recorded in the metadata store through the put_artifacts() function. Again, it generates an id that can be used for reference.

Generate execution unit

Next, you will create an instance of the Data Validation execution type you registered earlier. You will set the state to RUNNING to signify that you are about to run the TFDV function. This is recorded with the put_executions() function.

Register input event

An event defines a relationship between artifacts and executions. You will generate the input event relationship for dataset artifact and data validation execution units. The list of event types are shown here and the event is recorded with the put_events() function.

Run the TFDV component

You will now run the TFDV component to generate the schema of dataset. This should look familiar since you've done this already in Week 1.

Generate output artifact unit

Now that the TFDV component has finished running and schema has been generated, you can create the artifact for the generated schema.

Register output event

Analogous to the input event earlier, you also want to define an output event to record the ouput artifact of a particular execution unit.

Update the execution unit

As the TFDV component has finished running successfully, you need to update the state of the execution unit and record it again to the store.

Setting up Context Types and Generating a Context Unit

You can group the artifacts and execution units into a Context. First, you need to define a ContextType which defines the required context. It follows a similar format as artifact and event types. You can register this with the put_context_type() function.

Similarly, you can create an instance of this context type and use the put_contexts() method to register to the store.

Generate attribution and association relationships

With the Context defined, you can now create its relationship with the artifact and executions you previously used. You will create the relationship between schema artifact unit and experiment context unit to form an Attribution. Similarly, you will create the relationship between data validation execution unit and experiment context unit to form an Association. These are registered with the put_attributions_and_associations() method.

Retrieving Information from the Metadata Store

You've now recorded the needed information to the metadata store. If we did this in a persistent database, you can track which artifacts and events are related to each other even without seeing the code used to generate it. See a sample run below where you investigate what dataset is used to generate the schema. (*It would be obvious which dataset is used in our simple demo because we only have two artifacts registered. Thus, assume that you have thousands of entries in the metadata store.)

You see that it is an output of an execution so you can look up the execution id to see related artifacts.

You see the declared input of this execution so you can select that from the list and lookup the details of the artifact.

Great! Now you've fetched the dataset artifact that was used to generate the schema. You can approach this differently and we urge you to practice using the different methods of the MetadataStore API to get more familiar with interacting with the database.

Wrap Up

In this notebook, you got to practice using ML Metadata outside of TFX. This should help you understand its inner workings so you will know better how to query ML Metadata stores or even set it up for your own use cases. TFX leverages this library to keep records of pipeline runs and you will get to see more of that in the next labs. Next up, you will review how to work with schemas and in the next notebook, you will see how it can be implemented in a TFX pipeline.